How to add a page to the site including template selection, navigation and layout options.
Navigate in the site
- Use the Pages function within Kentico
- Expand sections in the content tree using the white plus on the blue circle - Read more about Navigating the Pages interface
- Select the parent in the content tree where you would like the new page to reside
- Click + in the toolbar above the content tree OR right-click on the parent and click 'New'
- Select the new page type, in this case select the Web Page content type
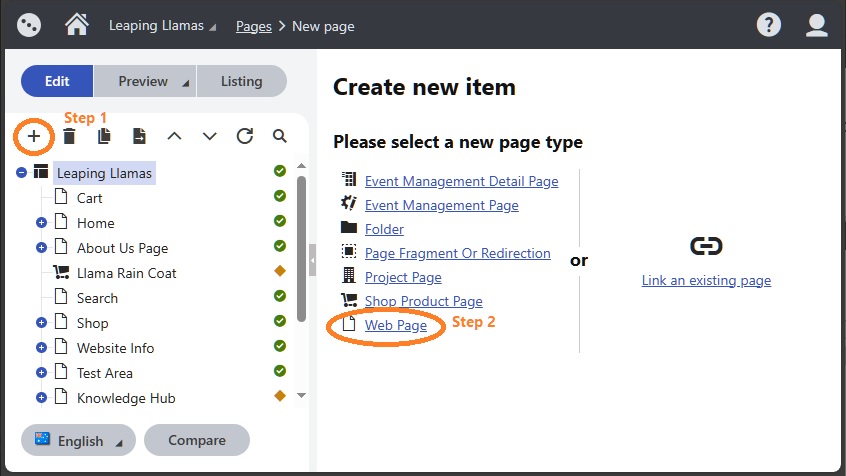
Note: Different content types have permission to appear in different contexts - under parents who are web pages, folders or page fragments, for example, different rules apply. The list that appears is the list that is permitted to be used in that context.
Understanding and Selecting Templates
- Select your template -
- Web page - landing page: Used for the home page and marketing landing pages
- Web page - one column: Use for most web pages where there is no side navigation menu
- Web page - two column: Use for most web pages where you would like the navigation menu on the left and content on the right
- Web page - popup: Use for windows that open as a popup
- Web page - no header Use for embedded html content pages
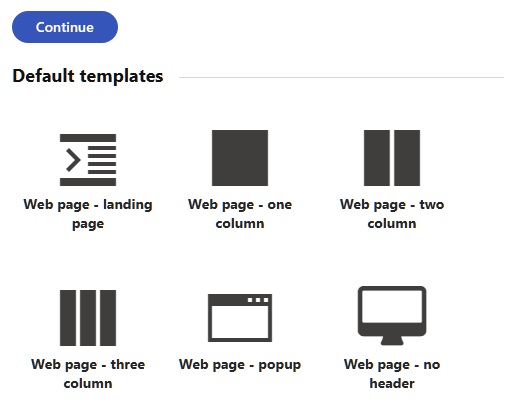
- Your site may have Custom Templates that you can also choose from.
- Click 'Continue'
Content tab
You will see the 'Content' tab in the beginning to undertake the basic configuration for the page.
Work through the fields in the content tab with as much time as you have. The more time you invest the better outcome you will get for your site.
- Label - page name in the back-end content tree
Summary Section
- Page Title - page name in the front-end display on the website
- Summary - used in the Compilation widget etc.
- Image - used in the Compilation widget etc.
- Image Caption - describe the Image for screen readers
- Date - For use in News items
- Author - For use in News items
Layout Section
Make your layout selections.
Navigation Section
- Kentico will create the ULR from the Page Name but you can change it and add aliases by clicking Properties then URLs
- By default, new pages will appear in the menu and sitemap once they are published but if you don’t want this to happen, click Properties then Navigation then un-tick Show in navigation and Show in sitemap
Save
You will have two options when you are ready 'Save' or 'Save & Create Another'
Note: It can be very efficient when making many pages to set them all up first with the 'Save & Create Another'.